
Bronze Star Keychain
Ben Gillette · November 27th, 2021

Project Outline
Having built my own metal foundry, I wanted to combine metalwork with my skills in 3D printing for a project. I settled on making a star keychain, a seemingly simple project, but one that turned out to be much more challenging than I anticipated. The process I had planned out was to design and 3D print a model of the star with sprues built in, then make a silicone mold of the 3D print and make a wax version. After I had a wax model, I would submerge the wax in plaster. Once the plaster cured I could finally melt the wax out and have a mold to pour my metal.
Design Process

I started by modeling the star in fusion. To begin, I created the basic shape I was looking for by sketching two inscribed pentagons. I was making a normal (evenly proportioned) star, so taking 360 degrees divided by 10 points on the star gave me 36 degrees of rotation between each point. For the points of the star, I used the large pentagon’s vertices as end points. Then, I made the smaller pentagon and rotated it the 36 degrees we found, using its vertices for the inside points of the star. As can be seen, by connecting the vertices of each pentagon we end up with a star. I opted for a larger body with shorter points so that the casting process would be smoother.

Star model before the addition of sprues
From there it was time to create the 3D shape. I first attempted to create an angled extrusion, but I found that even if my numbers were too perfect to make any difference in printing, there was still an issue where the center of the star wouldn’t be a perfect point. So instead, I created a construction point and lofted the sketch to a single point, then mirrored it, solving the extrusion issue.

Original design (sprue too small)

Improved 2nd iteration
The next step was creating the model for casting. At first, I created the model on the left. Both of these iterations have the same funnel with a large capacity for holding the casted liquid, but in my first iteration I realized that the sprue running into the mold was far too small after printing an initial test. After that, I created the model on the right that has a much larger sprue running into the star. This will allow for easier casting when it comes to the wax and metal.

Failed print - first layer didn’t adhere properly

Final 3D printed model
Next was 3D printing. My first attempt had an issue with the side support printing correctly on the first layer, so I canceled the print and started a second iteration, which turned out well as can be seen on the right. I removed the supports, then cleaned strings and rough spots off to prepare the model for silicone casting.

Silicon mold being made
I created my mold out of silicone by first taking the 3D printed master and hot gluing it to a popsicle stick. This orientation points the sprue and funnel upwards, which is what we want for casting. Then, I filled my molding cup which can be seen above with water to measure the volume of silicone I would need to mix. With that amount in mind I mixed the silicone and poured the mold around the print. After that was done, I put some tape over the top to keep the plastic which was full of air from floating up out of the silicone. After waiting 24 hours, the silicone could be removed from the cup and was fully cured with the 3D print inside. To remove the PLA master, I cut into the silicone with a knife on both sides, allowing me to peel the mold in two and remove the plastic. The silicone holds its shape, so when it is pressed back together an empty cavity with the shape of the 3D print remains.

Wax sprue

Wax star model
Now that I had an empty silicone mold, it was time to create the wax model. The process was fairly simple, all I had to do was melt down the wax, place the silicone in the curing cup for added support, and pour the wax into the funnel cavity. The wax takes about 20-30 minutes to fully harden, and after that point the mold can be pulled apart on the cut lines and the new hardened wax copy can be taken out. I did run into a problem with air getting trapped in the points of the star, but I solved this by creating a new silicone mold, with a 3D print that I added sprues to, allowing air to escape the points of the star. Pouring the wax into that mold allowed the points to fully form, and gave me a better wax copy. Getting a clean final copy took a couple of attempts, but eventually I got a good casting to use in the next step of the process.

Plaster mold in process
Using my wax model, the next step was to create the plaster mold. The only problem was that similar to how I ran into problems with air bubbles with the wax model, I guessed that metal would have similar issues. To combat this issue, I took the same steps, adding sprues to the end of the star points on the wax model. The only trouble was how to cast a sprue, and how to add it on to the model. Ms. Geer gave me the idea of pouring wax into a straw to use for sprues which turned out to be very effective. Using those, I melted them on with a lighter, attaching them to the points of the star. One of the unattached sprues can be seen on the left, with the plaster mold being created on the right. Having the wax done, I was ready to pour the plaster. I combined a mixture of plaster of paris and water, and then submerged the wax mold in the plaster. While it was curing, I used a screwdriver to repeatedly tap the mixture in order to release any air bubbles, which might cause the mold to crack during metal casting. I left the plaster to cure for an hour, then cut away the container I made the mold in leaving just the plaster. The other issue with metal casting is any water left in the mold will flash boil and create cracks, so it is important the plaster remains dry. I also needed to remove the wax to leave the cavity I would be casting the metal into, and to do this I placed the mold in the oven and baked it for 4 hours. This melted out all the wax, and completely dried out the plaster, solving both problems. This process left me with an empty, dried plaster mold, ready for bronze casting.

My metal foundry

Star casting straight from the mold
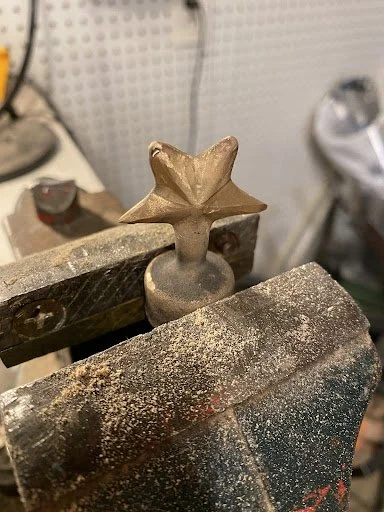
Grinding off excess material & polishing
To complete the final step of my project, I had to create the final bronze model. I started with my metal foundry, heating up and melting a small amount of bronze. I run my foundry using a torch connected to a propane tank, and melt my metal in a clay graphite crucible. Bronze has a melting temperature of about 1700 degrees Fahrenheit, and from experience I’ve found it useful to keep heating the metal past the melting point in order for it to stay malleable longer inside the mold. After the melting was completed, I removed the crucible using a pair of tongs, and carefully poured the bronze into the plaster. The mold steamed a fair bit, but the overall casting was fairly successful and can be seen in the top left image after it was removed and cooled. The casting was only the first step though, I used a dremel to trim and shape the points of the star that had previously had sprues on them, and to smooth out the other points of the star. The model after a little bit of work can be seen on the upper right. The grinding was a long and time consuming process, as there were so many planes on the star to smooth. However, after a lot of fine tuning and shaping I came out with the final result that can be seen below.
Final product
Over the course of this project I’ve had a lot of time to finetune my metalworking process and my workflow when it comes to turning 3D printed objects into metal ones. I had to combat a lot of challenges with this process, working with wax was very difficult as pieces were easily broken or melted. Most of my problems came from the intermediate wax step, 3D printing was fairly straightforward, along with the silicone mold, plaster, and the metal casting. I managed to work out most of the kinks with the wax model by using sprues and getting some practice making wax models, but in the future I think it may be beneficial to consider another method of production. When I work on future versions of this project and other metal casts, I will try eliminating the wax step by making a mold of the 3D print that I can cast metal directly into. My next step would be some form of green sand casting, where I create a sand mold of a 3D print, remove the plastic, and then cast the metal into the sand mold. I think this process is more likely to be successful, as it removes the intermediate casting and makes the metal output much closer to the original 3D design. Another area for improvement would be my final touch ups. The dremel bit I had was fairly rough, which left a very textured finish. I personally didn’t mind this, but the outline was fairly rough in general. In future versions, I will try working with some polish and sanding to work on the finish for metal products. Overall though, I’ve learned a lot from this project and I’m excited to work more in the realm of metal casting 3D prints.