
Self-Watering Plant
Ben Gillette · November 13th, 2020

The project we chose to do for our end of quarter assignment was to finish up and build a working, usable model of our automatic garden. Our plan was to use a pump, water reservoir, and other components to not only automatically water a plant when it was getting dry, but also give other information such as when the water tank needed to be refilled. We went through a couple of iterations and ideas and decided that the plan we wanted to go with was to make the smart-pot check soil moisture and water if necessary on a 24-hour cycle so that the plant could have some natural periods of dryness. We also chose to put an ultrasonic distance sensor on top of the water reservoir and used it to measure the percentage of water left in the tank, which was then translated to 4 LEDs on the front of the pot. We decided to use the LEDs instead of an LCD because we wanted the design to be fairly low profile, and the LED's seemed like a cleaner and more energy-efficient way of displaying water level.
Water Reservoir & 3D Printed Parts

The water container we used (just an old piece of Tupperware for this model) was sort of the central hub for our entire design. We 3D printed and attached brackets for the ultrasonic sensor and the pump to clip into so that they would be securely held inside the chamber and for the distance sensor it made sure there wasn't any shifting so we got a consistent read. You can see in the above image that we also had fill markings on the side of the container. I marked 4 fill lines (one for each LED on the water meter) and then measured the distance in centimeters from the bottom of the container to the fill mark. I also marked the location and height of the ultrasonic sensor which you can see at the top. This helped with programing as I could simply read the height difference from the fill line I wanted to the height of the distance sensor and set that to a variable for each fill line to clean up the code a little bit.
Wiring and Assembly
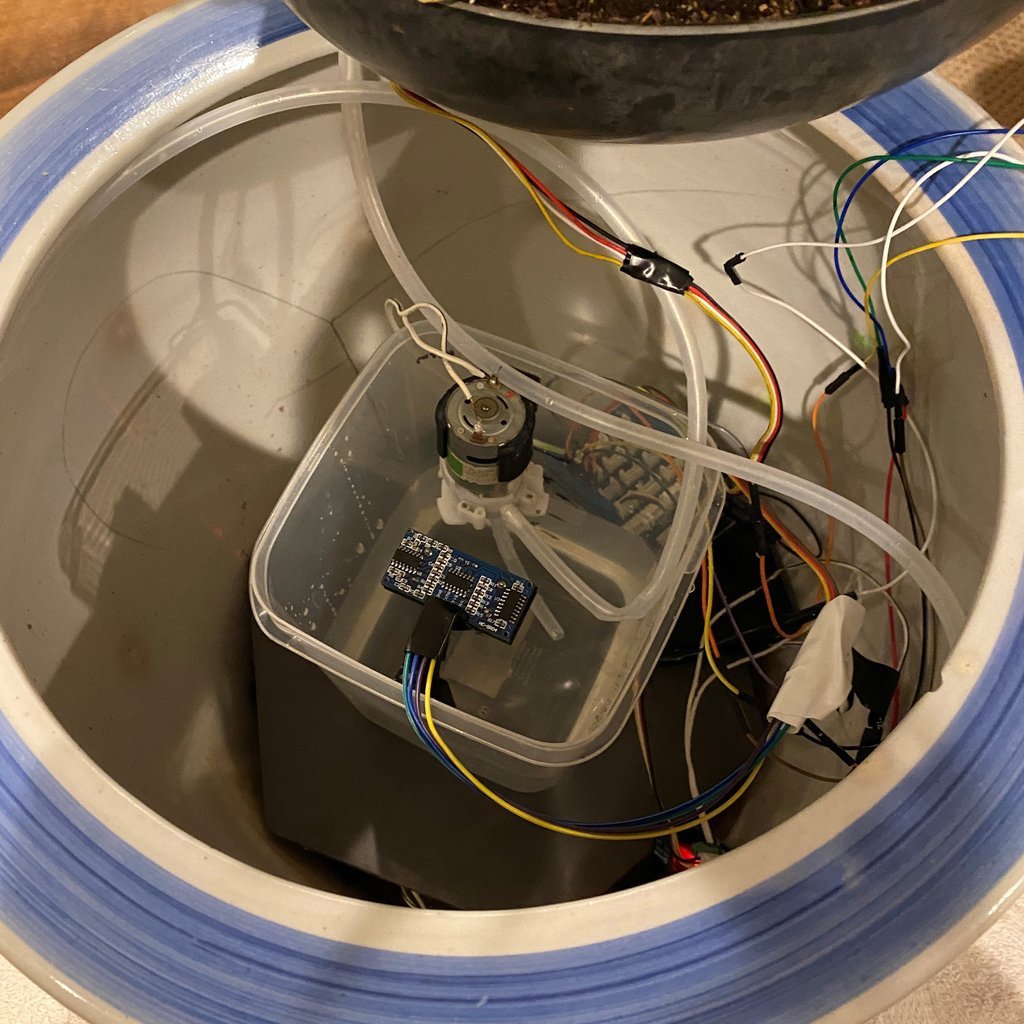
Our wiring and assembly job was a bit of a mess as you can see, mostly due to having to work with some long segments of wire that had to just get stuffed into the pot. We mounted the water container onto a tile using some double-sided tape which helped keep everything stable and acted as the 'heart' of the whole operation. After mounting the water container and securing the pump and distance sensor, we set the Arduino and relay on the tile and put the whole assembly into the larger 'shell' pot as you can see in the picture. Most connections to the Arduino were fairly simple, digital connectors for the LED pins, relay pins, and ultrasonic pins, then an analog connection to the soil moisture sensor in the pot. We used the grove seed shield, however, that isn't really necessary at all it just allowed us to use some different cables all the connections could've been made directly to the board. In regard to non-Arduino wiring and connections, we had a circuit set up with a universal power supply connected to a wall socket to power the motor because we didn't want to have to worry about batteries for the version, and this was on a circuit with the motor and relay so the Arduino could control the motor without having to directly power it which would be impossible. The last special connection we made way running a long jumper wire along with the water-out tube from the pump through a hole in the bottom of the plant pot to the moisture sensor and plant respectively. This made it so we didn't have to have any weird cabling running up the sides. The pump line was situated in a ring around the plant with holes poked in it so that it acted similar to a drip line and provided even water coverage.
Circuit Diagram

This circuit diagram shows the wiring a little better than the physical model in this case as most objects are concealed in some way. Here it is more clear and you can see the sort of four distinct sections of the circuit. On the bottom, we have the relay and pump, the bottom right has the moisture sensor, the top right has the ultrasonic sensor, and finally, the top left with the 4 LEDs.
Along with the circuit diagram, here are the materials we used for the full project:
1x Arduino Uno
1x Soil Moisture Sensor
1x Single Channel Relay
1x Ultrasonic Distance Sensor
4x LEDs
1x 220 Ω Resistor
1x DC Water Pump
Power Supply for Pump and Arduino
2 Water Tubes
Water Reservoir
Spare wires and jumper wires
Staples, Electrical Tape, Double Sided Tape
3D printed ultrasonic mount and motor mount
Conclusion and Code
I've had a lot of fun with this project in the time that we've been working on it, and I've learned a lot about Arduino programming and new sensors in a way that I think is really applicable to real-world problems like this auto garden. Learning how to use the ultrasonic sensor was one of the most interesting parts to me, as it can be used for so many different things. I think there's a lot of room for improvement with this design, obviously, this is a functional model, but wit the most ideal circumstances it would be nice to take the time to possibly make the entire circuit run from batteries and an Arduino nano to cut down on cost and form factor. I also think the next step to this project would be either making a fully-fledged plant incubator with grow lights and everything or maybe even make a sull outdoor setup for use monitoring a variety of plants with multiple sensors. A project I currently have at my house is setting up our garden boxes, so maybe I could even make a circuit with a solenoid instead of the water pump. In conclusion, though, this is a great project that I've learned a lot from, and I look forward to taking it even further in the future with bigger projects and improvements.
Citations:
A thank you to the Arduino forms for research on all the functions in the reference, and this article about the millis function for long term loops:
https://www.arduino.cc/reference/en/language/functions/time/millis/
//code made by Kiran Gupta and Benjamin Gillette const int ultraTrigger = 13;

//gives names to pins 4, 7, 8, 9, 10, 12, 13, and A0
const int ultraEcho = 12;
const int relayPin = 4;
const int LED1 = 10;
const int LED2 = 9;
const int LED3 = 8;
const int LED4 = 7;
const int moisturePin = A0;
float ultraDuration;          //defines the following variables as a number with a decimal
float waterDistance;
int soilMoisture;             //defines the variable soilMoisture as an integer
unsigned long previousMillis = 0;       //defines the following variables as being a positive 32 bit number
unsigned long currentMillis;
const int timeWait = 86400000;          //defines the amount of time (in milliseconds) that the program waits to run an update to soil moisture and                                                                 //water level (1 day in this example)
const float fullTank = 4;               //the distance in centimeters from the ultrasonic sensor to the following fill lines
const float threeQuarterTank = 6.5;
const float halfTank = 9;
const float quarterTank = 11.5;

void setup() {
  pinMode(ultraTrigger, OUTPUT);     //sets the folowing pins to outputs
  pinMode(ultraEcho, INPUT);
  pinMode(moisturePin, INPUT);
  pinMode(relayPin, OUTPUT);
  pinMode(LED1, OUTPUT);
  pinMode(LED2, OUTPUT);
  pinMode(LED3, OUTPUT );
  pinMode(LED4, OUTPUT);
  Serial.begin(9600);                 //begins the serial monitor at 9600 b/s
}

void loop() {
  currentMillis = millis();                           //sets the variable currentMillis to the number of milliseconds the program has been running
  if(currentMillis - previousMillis >= timeWait){     //if the difference between the current number of millis the program has run and the previous                                                                                     //interval this if loop ran is bigger than timeWait (see above), run the code here
    previousMillis = currentMillis;                   //sets the variable previousMillis to the current number of millis since program start (important to                                                                               //above if statement)
    soilMoisture = analogRead(moisturePin);           //sets the variable soilMoisture to a value between 0 and 1023 based on the moisture of the                                                                                      //soil (larger number is more moist)
    if(soilMoisture < 605){                           //is the soil moisture is less than 605, water the plant for 1 second (moisture threshold and watering                                                                           //time can be adjusted here)
      digitalWrite(relayPin, HIGH);
      delay(1000);
      digitalWrite(relayPin, LOW);
    }
    Serial.print("Soil Moisture: ");                  //prints "Soil Moisture: ____" on the serial console
    Serial.println(soilMoisture);

    //reads the water level in the resivoir
    digitalWrite(ultraTrigger, LOW);              //sends a 10 microsecond pulse from the ultrasonic emitter (slight delay at the begining to make sure                                                                        //everything is off)
    delayMicroseconds(2);
    digitalWrite(ultraTrigger, HIGH);
    delayMicroseconds(10);
    digitalWrite(ultraTrigger, LOW);
    ultraDuration = pulseIn(ultraEcho, HIGH);     //measures the time that the echo pin from the ultrasonic sensor reads HIGH in microseconds
    waterDistance = (ultraDuration*.0343)/2;      //finds the distance by multiplying the time by the speed of sound, then divide by 2 to account for                                                                               //the sound travelling to and back
    Serial.print("Distance: ");                   //prints "Distance: ____" on the serial monitor
    Serial.println(waterDistance);

    //if loops that shows the water level using 4 LEDs
    if(waterDistance <= threeQuarterTank){                                          //if water is above 3/4 mark turn on 4 LEDs
      digitalWrite(LED1, HIGH);
      digitalWrite(LED2, HIGH);
      digitalWrite(LED3, HIGH);
      digitalWrite(LED4, HIGH);
    }
    else if((waterDistance <= halfTank) && (waterDistance > threeQuarterTank)){     //if water is above 1/2 mark turn on 3 LEDs
      clearLEDs();
      digitalWrite(LED1, HIGH);
      digitalWrite(LED2, HIGH);
      digitalWrite(LED3, HIGH);
    }
    else if((waterDistance <= quarterTank) && (waterDistance > halfTank)){           //if water is above 1/4 mark show 2 LEDs
      clearLEDs();
      digitalWrite(LED1, HIGH);
      digitalWrite(LED2, HIGH);
    }
    else if(waterDistance > quarterTank){                                            //if water is below 1/4 mark show 1 LED
      clearLEDs();
      digitalWrite(LED1, HIGH);
    }
    else{                                                                            //if other readout show middle LEDs (error)
      clearLEDs();
      digitalWrite(LED2, HIGH);
      digitalWrite(LED3, HIGH);
    }
  }
}

void clearLEDs(){                 //custom function that turns off all LEDs
  digitalWrite(LED1, LOW);
  digitalWrite(LED2, LOW);
  digitalWrite(LED3, LOW);
  digitalWrite(LED4, LOW);
}